Piano Notes for Beginners: Keyboard Layout Guide
When you sit at the piano, the keyboard can look like a lot of repeating keys with no obvious starting point. The good news is that the layout is very organized. Once you learn the black-key pattern, you can name every white key, understand sharps and flats, and find any note quickly.
This guide focuses on the keyboard itself. If you also want to learn how these notes show up on the staff, pair this with our sheet-music guide.
The piano keyboard is a repeating pattern
Start by ignoring the full length of the keyboard. You do not need all 88 keys at once. You only need to notice one visual fact:
- black keys come in groups of 2
- then groups of 3
- then 2 again, then 3 again
- this pattern repeats all the way up and down
That repeating pattern is your map.
If a student freezes and says, “I can never find the right note,” this is where I start: not with letter names first, but with the 2-black-key group and 3-black-key group. They are easier to spot than any printed letter.
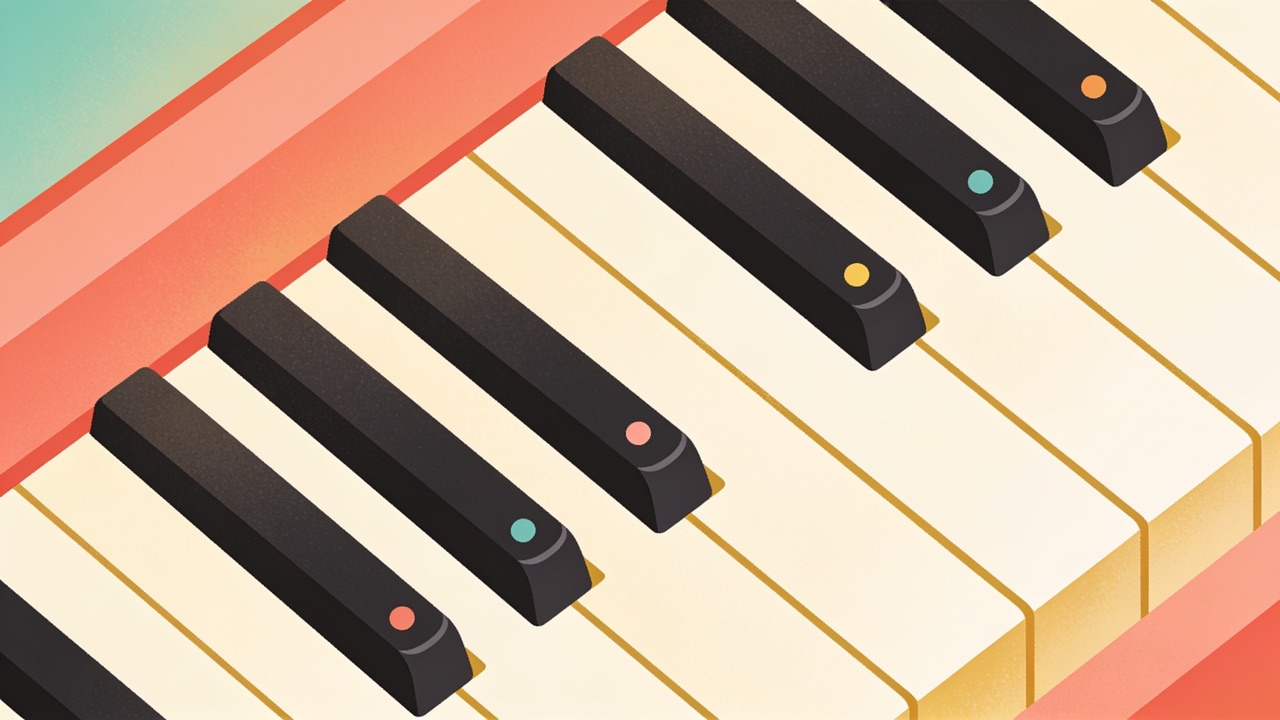
Find C first
Look at any group of 2 black keys.
The white key immediately to the left of that group is C.
That is the most useful anchor point on the keyboard.
Try it in three places:
- near the middle of the piano: left of a 2-black-key group = middle C
- farther left: left of another 2-black-key group = a lower C
- farther right: left of another 2-black-key group = a higher C
Every one of those notes is called C. They sound higher or lower, but they share the same note name.
Naming the white keys using black-key groups
Once you can spot C, the rest of the white keys become simple.
The notes around the group of 2 black keys
Find a group of 2 black keys. The white keys around it are:
- left of the group = C
- between the two black keys = D
- right of the group = E
So the pattern is:
C - D - E
Say it while pointing:
- C is left of the pair
- D is in the middle of the pair
- E is right of the pair
This gives beginners a clear picture. You are not memorizing random labels. You are connecting note names to shapes you can see.
The notes around the group of 3 black keys
Now find a group of 3 black keys. The white keys around it are:
- left of the group = F
- between black keys 1 and 2 = G
- between black keys 2 and 3 = A
- right of the group = B
So the pattern is:
F - G - A - B
Now you have all seven white-key names:
- C D E around the 2-black-key group
- F G A B around the 3-black-key group
That is the whole white-key system.
A quick way to test yourself
Pick one group of black keys and name every white key around it.
For example:
- around 2 black keys: C, D, E
- around 3 black keys: F, G, A, B
Then move to a different part of the keyboard and do it again. If you can do that in three places, you are starting to read the keyboard instead of guessing.
Why the letters repeat: octaves
Music uses only seven letter names:
- A n- B
- C
- D
- E
- F
- G
After G, the pattern starts again at A.
On the keyboard, when you go from one C to the next C, or one A to the next A, you have moved an octave.
An octave means the same note name repeated at a higher or lower pitch.
Examples:
- one C can be low and rumbling
- another C can be near the middle
- another C can be bright and high
They are all C.
Middle C
The most commonly used landmark is middle C.
On a full piano, middle C is close to the center of the keyboard. It is the white key immediately to the left of the middle group of 2 black keys.
Many beginner pieces use middle C as a home base. In Ode to Joy, students often start by recognizing notes close to that central area. If middle C feels familiar, reading and hand placement both get easier.
White keys and black keys: the full step-by-step layout
The piano is built from half steps.
A half step is the distance from one key to the very next key, whether it is white to black, black to white, or sometimes white to white.
Examples:
- C to the black key right above it = half step
- E to F = half step
- B to C = half step
A whole step is two half steps.
Examples:
- C to D = whole step
- F to G = whole step
- A to B = whole step
This matters because sharps and flats are based on moving by half step.
Sharps and flats without confusion
Beginners often hear these terms before they really see them on the keyboard. Let the keyboard explain them.
What is a sharp?
A sharp means one half step higher.
The symbol is #.
Examples:
- C-sharp = the key one half step above C
- F-sharp = the key one half step above F
- A-sharp = the key one half step above A
On the keyboard, C-sharp is the black key between C and D.
What is a flat?
A flat means one half step lower.
The symbol is b.
Examples:
- D-flat = the key one half step below D
- G-flat = the key one half step below G
- B-flat = the key one half step below B
On the keyboard, D-flat is the same black key between C and D.
One key, two names
This is the part students usually need to hear twice:
The same black key can have two different names.
For example:
- the black key between C and D = C-sharp or D-flat
- the black key between F and G = F-sharp or G-flat
- the black key between A and B = A-sharp or B-flat
Which name you use depends on the music.
At beginner level, what matters most is recognizing that both names point to the same physical key.
The black keys have a pattern too
There are five black-key names within one octave:
- C-sharp / D-flat
- D-sharp / E-flat
- F-sharp / G-flat
- G-sharp / A-flat
- A-sharp / B-flat
Notice what is missing:
- there is no black key between E and F
- there is no black key between B and C
That is why E to F is already a half step, and B to C is already a half step.
This catches many beginners in the first week. They expect every white key to have a black key next to it. Not true.
Useful examples
Try these on the keyboard:
- play E, then move one half step up to F
- play B, then move one half step up to C
- play C, then move one half step up to C-sharp
- play A, then move one half step down to A-flat
If you can feel those distances clearly, accidentals make much more sense when you read music later.
How to find any note fast
You do not need to count from the bottom of the keyboard. Good players use landmarks.
Method 1: Find the nearest black-key group
Suppose I ask you to find A.
Do not scan every white key. Instead:
- Find a group of 3 black keys.
- A is the white key between the second and third black keys.
To find D:
- Find a group of 2 black keys.
- D is the white key between them.
To find B:
- Find a group of 3 black keys.
- B is the white key immediately to the right of the group.
This is the fastest beginner method by far.
Method 2: Start from C and move by letter names
Suppose you can find C quickly but forget A.
Start at C and move forward:
- C, D, E, F, G, A
Now you know where A is.
This method is slower than using black-key groups, but it helps reinforce the note order.
Method 3: Use octave copies
If you already found one note, you can find another note of the same name by moving to the next octave.
For example:
- find one G between the first and second black keys of a 3-black-key group
- now move to the next 3-black-key group up or down
- the matching white key there is also G
This is especially helpful when your music jumps between low and high notes.
Finger numbers help you orient the keyboard
Beginners do better when note names and finger numbers are learned together.
Finger numbers are:
- 1 = thumb
- 2 = index
- 3 = middle
- 4 = ring
- 5 = little finger
For the right hand on five adjacent white keys starting at middle C:
- 1 on C
- 2 on D
- 3 on E
- 4 on F
- 5 on G
For the left hand in the same area:
- 5 on C
- 4 on D
- 3 on E
- 2 on F
- 1 on G
This matters in simple pieces. In Ode to Joy, a beginner might play nearby notes around E, F, and G with steady finger numbers. In the opening of Für Elise, you immediately see that named notes and keyboard geography must work together: E, D-sharp, E, D-sharp, E, B, D, C, A.
Even if a piece is not fully at your level yet, saying the note names while locating them on the keyboard is great training.
Practice drills that actually work
Memorizing the keyboard happens faster when you do short, specific drills instead of long unfocused playing.
1-minute white-key drill
Pick one black-key group at a time.
For one minute:
- point to every 2-black-key group and say C, D, E
- point to every 3-black-key group and say F, G, A, B
Keep your tempo steady. Accuracy first.
Random note challenge
Ask yourself to find 10 notes in random order:
- C
- A
- E
- D
- B
- G
- F
- high C
- low A
- middle C
Say the answer out loud as you play it.
Sharp and flat drill
Choose one white key and find the nearest accidental.
Example set:
- C -> C-sharp
- D -> D-flat
- F -> F-sharp
- A -> A-flat
- B -> B-flat
Then reverse the direction:
- E-flat -> E
- G-flat -> G
- A-sharp -> A
Octave drill
Find one note, then all its octave copies.
Try:
- all the Cs
- all the Fs
- all the B-flats
This is a very practical skill for reading songs with repeated patterns.
Common mistakes beginners make
These are the errors I see most often.
Counting every white key from the bottom
This is too slow. Use the black-key groups as landmarks instead.
Forgetting E-F and B-C
Remember:
- E to F is a half step
- B to C is a half step
No black keys in between.
Knowing middle C only
Middle C is useful, but it is not enough. You also want instant recognition of D, F, G, A, and B in any octave.
Confusing note names with finger numbers
C is a note. 1 is a finger. They work together, but they are not the same thing.
How this connects to reading sheet music
Keyboard geography and note reading should grow together. If you only learn note names on the piano, reading will feel abstract. If you only learn notes on the staff, the keyboard will feel slow.
That is why I like students to connect both right away:
- see the note on the staff
- name it
- find it on the keyboard
- play it with the correct finger
This is exactly where a structured tool helps. On Pianodemy, you can match the notation to an interactive keyboard and test your note finding in real time, which is much more effective than staring at a printed diagram.
For a next step, open our sheet-music guide and connect these keyboard landmarks to treble and bass staff notes.
Beginner pieces where note-location skills matter
A few well-known pieces show why this topic matters.
Ode to Joy
Great for early note recognition around a small hand position. You can focus on nearby notes like E, F, and G without big jumps.
Minuet in G
This piece asks for more fluent note reading and clearer awareness of hand position changes. If you know your keyboard layout well, the notes stop feeling random.
Für Elise
Even if you are not ready to play the whole piece, the famous opening is a perfect note-finding exercise: E, D-sharp, E, D-sharp, E, B, D, C, A. It shows how natural notes and accidentals live together on the keyboard.
A simple weekly plan
If you are just starting, use this for 7 days:
Days 1-2
- find every C on the keyboard
- name C-D-E around each 2-black-key group
- practice middle C with both hands
Days 3-4
- name F-G-A-B around each 3-black-key group
- find A, B, and G quickly in three different octaves
- review finger numbers 1 to 5 on each hand
Days 5-6
- practice sharps and flats: C-sharp, D-flat, F-sharp, B-flat
- test E-F and B-C half steps
- play random note challenges for 2 minutes
Day 7
- find any white key named by a friend or by your own written list
- locate three black-key notes by both names, such as G-flat/F-sharp
- try a simple melody and say the note names as you play
Ten focused minutes is enough.
Keep your eyes on the pattern, and the keyboard will start making sense fast.
Frequently asked questions
How do I find middle C on the piano?
Look for the group of two black keys near the center of the keyboard. The white key immediately to the left of that pair is middle C.
Why are there only seven white-key letter names?
Music uses the letters A through G, then the pattern repeats. When you go from one C to the next C, you have moved one octave.
What is the difference between a sharp and a flat?
A sharp means one key higher, and a flat means one key lower. For example, the black key between C and D is C-sharp and also D-flat.
Are all black keys sharps or flats?
Black keys are usually named as sharps or flats depending on the musical context. The same key can have two names, like F-sharp and G-flat.
How can I memorize note names faster as a beginner?
Use the black-key groups as landmarks and name notes around them out loud: C-D-E around two black keys, and F-G-A-B around three. Then practice finding random notes, like A, E-flat, and high C, with one hand while saying the name.